
You’ve just pulled a polished 1.2316 cavity out of the machine — and there they are. Tiny craters, scattered like the surface of the moon, mocking everything you did right.
Pinholes in 1.2316 are one of the most frustrating defects a mold maker can face. They show up after the hard work is done. And the fix isn’t always clear. The cause could be buried in the steel itself. It could be hiding in your EDM recast layer. Or it could be sitting inside your polishing sequence.
This guide cuts through the guesswork. You’ll get every real root cause laid out, a clear way to diagnose which one you’re dealing with, and steps to make sure it never costs you another cavity.
What Pinholes In 1.2316 Steel Look Like
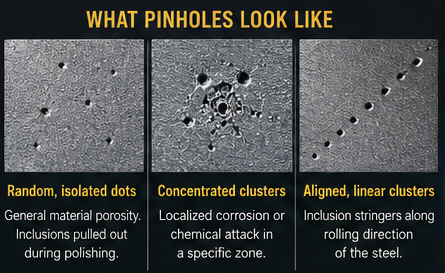
Check polished 1.2316 steel under low-angle light. Pinholes appear as sharp, dark micro-shadows. These pits form three distinct visual patterns:
- Random, isolated dots: You find scattered, single micro-pits. General material porosity causes this defect. Sometimes the fine polishing process rips internal inclusions directly out of the steel matrix.
- Concentrated clusters: Look for dense crater groups with rough, uneven edges. Localized corrosion generates these voids. A chemical attack in a specific zone creates a similar pattern.
- Aligned, linear clusters: You get strings of tiny voids following a straight path. These track the original rolling direction of the steel. They reveal inclusion stringers left by the mill.
(Note: A uniform surface haze means you do not have true pinholes. A polishing error or a fresh corrosion film creates this hazy look.)
Why Do Pinholes Keep Happening in 1.2316 Steel?
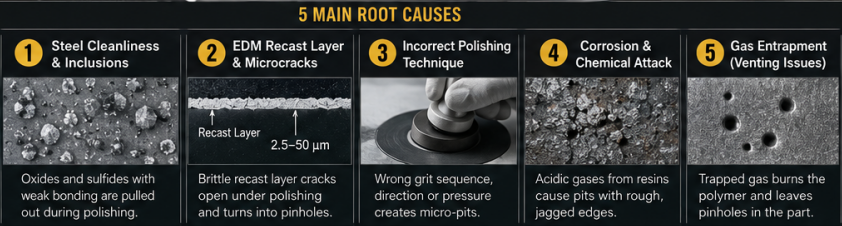
1. Steel Cleanliness and Internal Inclusions
Steel cleanliness is a root cause of pinholes locked inside the material before machining even begins. In basic 1.2316 steel, hard non-metallic inclusions like oxides and sulfides have a surprisingly weak bond with the surrounding matrix. When you reach fine polishing, surface shear stress literally rips these 5–10 µm particles out. You are left with sharp, angular micro-voids.
The material grade you buy dictates your failure rate here. Standard batches routinely expose over 50–100 micro-voids per 10 mm². In contrast, highly refined blocks—like FCS 1.2316 ESR—control sulfur and inclusions to such extreme lows that this number drops to near zero. If the pinholes multiply as your polish gets shinier, you aren’t doing anything wrong. You simply started with the wrong steel.
2. EDM Recast Layer and Subsurface Microcracks
Underneath a seemingly smooth EDM finish lies a brittle trap: the recast layer (white layer). EDM melts the steel, and the metal that fails to eject hardens rapidly back onto the surface. This creates a highly stressed, crack-riddled film typically 2.5–50 µm thick.
You won’t see this damage initially. The real trouble hits during your finishing sequence. When aggressive stoning or polishing pressure hits this brittle zone, it literally tears the layer open. The polishing process exposes those hidden subsurface microcracks, converting them into visible pinholes.
Visual smoothness means nothing here. To prevent EDM-induced pinholes, your minimum safe stock removal target is 0.001″–0.003″ (25–75 µm) before fine polishing targeting. Always verify the hardened altered zone is actually cleared using microhardness testing or coupon cross-sections—don’t just guess by how shiny the steel looks.
3. Incorrect Polishing Sequence and Technique
Even with clean steel and no EDM recast, bad polishing habits on hardened 1.2316 physically manufacture pinholes. Avoid these three common errors:
- Skipping grits: Keep your progression 1.5–2× finer per step (P400→P600→P800→P1200). Jumping directly from P400 to P1000 leaves deep 4–6 µm scratches. Fine diamond paste will just round these out into 10–30 µm “fish-eye” pits instead of removing them.
- Not crossing polish directions: Change your stoning direction by at least 45°–90° at each grit change. If you don’t, you leave behind linear micro-grooves (0.5–1.5 µm deep) that trap gas and appear as aligned micro-pits on the molded part.
- Pressing too hard: Keep hand contact pressure light, around 0.05–0.1 MPa. Smashing the tool at high pressure smears the steel matrix around inclusions. This rips open 1–5 µm sub-surface voids that show up as dense, random pit clusters.
One More Trap: Orange Peel Masquerading as Pinholes
Polish 1.2316 below design hardness — or overheat the surface during polishing — and the soft matrix flows unevenly around carbides. The result isn’t true pinholes. It’s orange peel: a broad, rolling texture with peak-to-valley roughness of 0.5–3 µm at 20–100 µm pitch.
More polishing makes it worse. The fix is 20–70 µm stock removal by regrinding, followed by proper heat treatment before restarting the sequence. Extra passes on a softened layer dig the problem deeper, not shallower.
4. Corrosion and Chemical Attack
Sometimes the cavity looks flawless on day one. But after 5,000 shots, it starts failing. This slow breakdown usually points to chemical attack from resins like PVC. When these plastics heat up, they release corrosive acidic gases.
If the steel block lacks a highly uniform chromium distribution, this acid eats right into the matrix. The resulting corrosion pits have rough, jagged edges, unlike smooth gas traps. The fix? You need material with consistent micro-structure chemistry. Upgrading to a premium ESR grade ensures the steel resists these acidic attacks long-term, far better than standard plates.
5. Gas Entrapment
It is easy to blame the steel, but sometimes the tool design is actually at fault. Trapped mold gas compresses rapidly during injection. This scorches the polymer and burns dark micro-voids right into the part.
How do you tell the difference? Gas pinholes always cluster in specific areas like last-fill zones, blind pockets, or weld lines. If the defect only shows up in extreme corners, your raw material is completely fine. You just need to check your venting to let the air escape.
Step-By-Step Diagnosis: Find The Root Cause
Stop guessing about tool defects.
Ask one simple question: When did the pinholes first show up?
This diagnosis matrix helps you pinpoint the exact defect fast.
| Time of Appearance | What To Do | Root Cause |
|---|---|---|
| After polishing (0 shots) | Grab a profilometer. A fresh dent after material removal points to a hidden mold flaw. Inspect the surface at ≥50× magnification. Look closely for sharp, pulled materials. These marks reveal weak spots in your tooling. | #1 Steel Cleanliness #2 EDM Recast |
| First shot | Compare your mold cavities. A failure in the exact same spot reveals a geometry issue. Check the molded parts at 50×. Smooth, round holes indicate trapped air inside the tool. Proper venting fixes this. | #4 Cavity Contamination #5 Venting (Gas) |
| After 10k+ shots | Pull your maintenance logs. Compare the first parts against your recent production run. Isolated pits might merge into clustered voids. This means steady wear over time. High cycle counts break down the polish layer. | #3 Polish Breakdown #4 Corrosion Attack |
How To Fix Existing Pinholes In A 1.2316 Mold Cavity
Your repair path depends entirely on depth and density. Pick the wrong method, and you’ll permanently ruin the cavity finish.
- Shallow fine porosity: Fix surface dullness with light local re-polishing. Skip surface sealers—they do not hold up inside actual craters and just waste your time.
- Individual deep craters: Laser weld only. Never use TIG welding, as excess heat creates soft spots and color mismatch. Clean down to sound metal, build up using 1.2316-matched filler wire, and restart the full polishing sequence.
- Dense or recurring clusters: Replace the cavity insert. Chasing heavy porosity past your available stock destroys mold geometry. If you can’t guarantee a perfect cosmetic match, cut your losses and replace the steel.
Prevention Checklist: Stop Pinholes Permanently
Protect your tooling investment by controlling the materials from day one. Use this raw-material-focused checklist to block pinholes:
- Demand Premium Steel: Stop gambling on standard plates. Specify a highly refined grade like 1.2316 ESR. Limit sulfur to ≤ 0.005 wt% to guarantee a true mirror finish.
- Control Heat Treatment: Ensure rough cuts are properly stress-relieved. Doing a proper post-EDM temper prevents subsurface cracking in the alloy.
- Clear the Recast Layer: Visual smoothness lies to you. You must physically remove the hardened EDM zone (at least 25–75 µm) before any polishing begins.
- Adopt Strict Maintenance: Clean molds running corrosive resin frequently. If the polish starts to haze, address it early before deep chemical pitting occurs.
Conclusion
Pinholes in 1.2316 steel don’t happen by magic. Sure, poor polishing or trapped mold gas can ruin a surface. But if the steel itself is riddled with inclusions, you are fighting a losing battle before the CNC machine even turns on.
Stop wasting time and money chasing defects that are baked into the raw material. Start your next project with the right foundation. By upgrading to a high-purity grade, you lock out inclusion-based defects from day one. Excellent tooling steel never lies—it just saves you money.