Introduction:
Datasheets often lie by omission. They list standard hardness ranges but fail to warn you that a mere 2 HRC difference can shatter a $10,000 die halfway through a production run. Relying on generic specs for high-wear cold work isn’t just risky—it eats into your profit margins.
Whether you’re fighting edge chipping in blanking or battling compressive failure in forging, the “safe” hardness choice is often the wrong one. This guide moves beyond textbook theory, giving you the specific hardness strategies that prevent costly downtime and maximize cycle counts in your actual production environment.
1. Optimal Hardness Range

D6 tool steel works best at 58–62 HRC for high-wear cold working jobs. This hardness range delivers top carbide performance—hitting 2600MPa compressive strength. Plus, you get the crack resistance and stability your production dies need.
The best hardness sits at 60 HRC. You reach this through 200°C tempering after proper austenitizing. At this level, D6’s carbide network performs at full potential. You get wear resistance that’s 3–5 times better than regular alloy steels.
1.1 Application-Specific Hardness Targets
Each cold working job needs its own hardness setting:
- Punches and blanking dies work well at 58–62 HRC. Carbide hardness peaks here. Your edges stay consistent through millions of impacts. Cutting edges remain sharp under tough metal punching. Softer materials would dull within thousands of cycles.
- Stamping dies go a bit higher to 58–64 HRC. This gives 40% longer tool life compared to D2 steel in the same jobs.
- Cold forging stays at 58–60 HRC. Dies produce 100,000+ pieces without size drift.
- Drop forging dies need 60–62 HRC to handle repeated high impacts. Heat-treated D6 at this range lasts 300,000+ cycles before replacement.
- Shear blades work in the same 58–62 HRC range. They achieve 3–4 times the wear life of low-alloy steel options.
- Heavy-duty stamping dies for stainless steel require exact hardness of 60–62 HRC.This matters in tough, high-abrasion cold work.”
1.2 The Tempering Temperature Connection
Tempering temperature controls your final hardness:
- 200°C tempering → 61–63 HRC: Achieves maximum surface hardness. Best for high-wear sliding applications where impact is minimal.
- WARNING: Avoid 300°C–450°C: This is the Temper Brittleness Zone. Hardness might look good (58–60 HRC), but internal toughness hits rock bottom. Using a die tempered in this range is the #1 cause of catastrophic cracking.
- 520°C tempering → 58–60 HRC: The “Sweet Spot” for heavy-duty dies. This utilizes secondary hardening to provide superior dimensional stability and stress relief without sacrificing working hardness.
Critical Rule: Stay either below 250°C for max hardness or jump to 500°C+ for stability. Never “park” your tempering temperature in the 300°C-450°C range, or you are inviting a $10,000 failure.
1.3 Performance Characteristics Within Range
The 58–62 HRC range gives clear benefits:
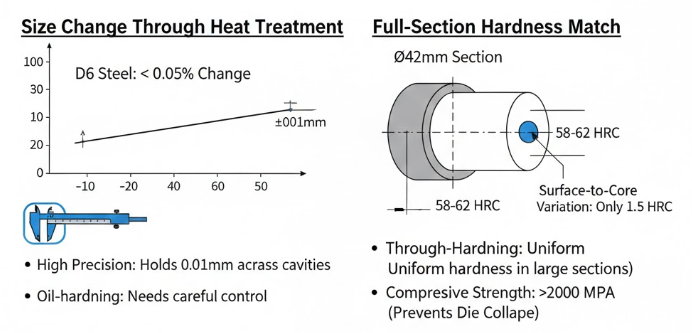
Dimensional stability stays tight.Heat treatment deformation typically stays within 0.1% to 0.15%This matters for multi-cavity molds that need 0.01 mm precision. Through-hardening stays excellent—a Ø42 mm section shows just 1.5 HRC variation between surface and core after heat treatment.
Compressive strength tops 2000 MPa. This stops die collapse and warping under heavy stamping loads. The carbide network blocks crack growth. Your mold corners stay intact under repeated impacts.
2. How D6 Steel Hardness Affects Mold Life
Hardness numbers impact your production costs. Data from stamping plants and forging shops show clear patterns. D6 steel hardness settings determine how long your dies last.
2.1 The Mechanics Behind Extended Cycle Life
Achieving the high cycle counts listed earlier depends entirely on how the microstructure handles specific loads. For drop forging, the 60–62 HRC target isn’t arbitrary; it guarantees the carbide network is dense enough to support impact loads topping 1320 MPa. At this level, the steel resists plastic deformation that usually kills softer dies.
In cold forging, the slight reduction to 58–60 HRC is a calculated trade-off. You sacrifice marginal surface hardness to gain necessary fracture toughness. This prevents the tooling from snapping under sustained, crushing forming pressures. Meanwhile, shear blades rely on this hardness range to turn carbides into a microscopic abrasion shield. This structure prevents the “edge rounding” that forces early regrinds on standard alloy steels.
2.2 How D6 Compares to D2 Tool Steel
D6 beats the popular D2 steel in the same jobs. Stamping dies made from D6 at 58–64 HRC last 40% longer than D2 dies at the same hardness. D6’s tungsten-boosted carbide structure makes this happen. The 0.6–1.3% tungsten content keeps carbides stable and makes the grain structure finer than D2 can achieve.
Aerospace broaching tools show the same gains. D6 tooling at 60–62 HRC gives you 40% longer service life than standard tool steels in tough titanium and nickel alloy work. The dense carbide network stands up to the harsh wear these aerospace materials create.
2.3 The Toughness Trade-Off
Heat treatment to 58–62 HRC has a cost: toughness drops by 50% compared to annealed state. Annealed D6 sits around 225 Brinell (about 20–25 HRC) with full toughness. Push it to 60 HRC and you lose half that impact resistance.
This explains why D6 works great for high-wear, steady-load jobs but fails in shock-load settings. Progressive dies stamping sheet metal see gradual, steady wear. Drop hammers with sudden impacts can crack the tool. Match your hardness choice to how the tool gets loaded.
2.4 Properties That Extend Life
D6’s compressive strength of 2600 MPa at working hardness stops die collapse under stamping loads that bend softer materials. The elastic modulus of 190–210 GPa (usually 194 GPa) keeps tool bending minimal during forming cycles. Less bending gives you tighter control over dimensions across production runs.
Through-hardening matters here. A Ø42 mm die section shows just 1.5 HRC difference from surface to core after correct heat treatment. This even hardness removes internal stress points that cause early cracking. Your die performs the same throughout its entire cross-section, not just at the surface.
2.5 How Machining Affects Service Life
Tool wear speeds up fast at cutting speeds of 70–90 m/min during D6 machining. Cutting forces jump in this same speed range. Higher feed rates and cutting depth make it worse. This creates more surface damage and higher cutting forces. Wear from rubbing and sticking dominates throughout D6’s working life. Know these patterns to predict maintenance needs and replacement timing.
3. D6 Steel: Size Stability and Even Hardness
Precision dies need more than hard surfaces. The material must keep its size through heat treatment. It must also have the same hardness from surface to center. D6 steel does both.
3.1 Size Change Through Heat Treatment
D6 steel changes less than 0.05% after hardening and tempering. This stability wins over case-hardened steels in precision cold-work jobs. Your fineblanking dies keep their cavity sizes tight through the full heat treatment cycle. Large progressive tooling does the same.
Oil-hardening causes bigger size changes than air-hardening D2 steel. You must control quench rates and temperatures with care. Tight tolerance tooling needs close process watching. D6’s superior wear resistance comes with a price: extra attention during heat treatment.
Dies operating at 58–64 HRC show minimal warping. This means less grinding stock allowance. You save machining time. Plus, multi-cavity molds hold 0.01 mm precision between cavities after heat treatment. Each cavity works the same across the full die set.
3.2 Full-Section Hardness Match
D6 hardens all the way through thick sections. High chromium and carbon content creates strong hardening ability. This beats D3 steel in large cross-sections. D3 often loses core hardness.
Large sections reach uniform 55–62 HRC throughout. A Ø42 mm die shows just 1.5 HRC difference from surface to core. Thicker sections hold this match better than D3 can manage. The smaller surface-to-core gap removes internal stress points that start cracks.
This full hardening gives you 1320 MPa compressive strength through the whole die body. Not just at the surface. Internal support matches external strength. Dies resist bending and collapse under heavy stamping loads.
3.3 Tempering Temperature Control for Even Hardness
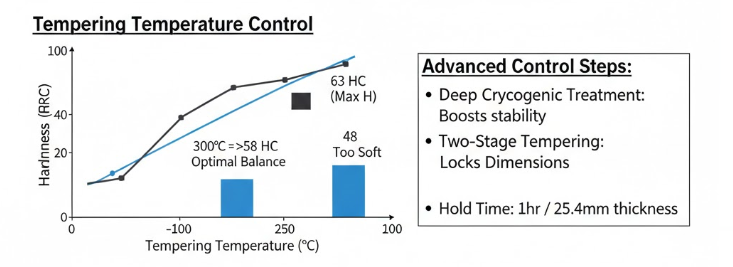
Double tempering with room temperature cooling between cycles creates even hardness. The tempering schedule controls your final hardness spread:
- 100°C tempering → 63 HRC (maximum hardness, minimal stress relief)
- 300°C tempering → Above 58 HRC (good wear resistance maintained)
- 500–600°C tempering → 55–62 HRC (best balance of hardness and match)
- 600°C tempering → 48 HRC (too soft for high-wear service)
Hold time matters: Allow 1 hour per 25.4 mm of cross-section thickness during tempering. This balances temperature through the die. Rushed tempering creates hardness gaps that cut service life.
3.4 Advanced Control Steps
Deep cryogenic treatment after quenching stabilizes carbides and improves hardness match. This optional step boosts size stability at working hardness of 60–62 HRC. The cold cycle transforms retained austenite to martensite through the full section.
High-temperature quenching followed by cryogenic treatment gives you the best mix of match and toughness. The carbide network formed during austenitizing stays stable. The cold treatment that follows removes soft spots. It does this without creating new internal stresses.
Watch size change through the process. Target less than 0.05% size change in the 58–62 HRC working range. This tight control cuts scrap rates. It also removes rework on finished tooling.
3.5 Section Size Impact on Match
D6’s hardening ability handles large sections well. But thicker sizes still risk higher core-surface mismatch without proper control. Match your quench rate to section thickness. Larger dies need slower, controlled cooling. This prevents surface-to-core hardness gaps.
The high chromium-carbon carbide structure promotes 60–62 HRC matching from surface to core. These carbides spread out during austenitizing. Proper cooling holds this spread through the change to martensite..
4. Limitations & Alternative Materials
While D6 offers exceptional wear resistance at 60 HRC, its dense carbide structure becomes a liability in specific conditions. If your application fits these scenarios, D6 will likely fail prematurely due to hardness limitations. Consider these alternatives instead:
- High-Impact Shock (Drop Hammers)
The Issue: At 60–62 HRC, D6 carbides are too brittle (Izod < 28 J) and shatter under sudden impact.
Better Choice: S7 Tool Steel. It delivers superior shock resistance at a lower 54–56 HRC range. - Operations Above 300°C (Hot Forging)
The Issue: Heat destroys D6’s working hardness. Exposure to 600°C drops hardness to a useless 48 HRC.
Better Choice: H13 Hot Work Steel. It maintains structural integrity and hardness up to 550°C. - Unpredictable Lateral Loads
The Issue: The rigid structure at 58+ HRC lacks ductility; it snaps rather than flexes under side-loading.
Better Choice: A2 Tool Steel. It offers a safer balance of toughness and stability for mixed-load environments.
5. Engineering Decision Matrix for D6 Steel Hardness Selection

Your die application sets your hardness target. Three factors drive this decision: wear intensity, impact frequency, and section thickness. Each combination points to a specific hardness range within D6’s 58–64 HRC working window.
5.1 Decision Framework by Loading Conditions
| Loading Condition | Target Hardness | Key Strategy | Ideal Applications |
|---|---|---|---|
| Pure Wear (Minimal Impact) |
60–64 HRC | Maximize surface hardness to hold cavity dimensions tight against sliding friction. |
|
| Mixed Conditions (Wear + Impact) |
58–62 HRC | Sacrifice slight hardness to gain fracture toughness and prevent snapping. |
|
| Impact-Dominant (Heavy Shock) |
❌ Avoid D6 | Do not use. Carbide structure fractures under shock (Izod < 28 J). |
|
Next Steps: Applying This Matrix
Don’t guess—audit your failures first. Look at your scrap bin. If you see chipped edges in a “Mixed Condition” job, you’re likely pushing that 62 HRC upper limit too hard—dial it back to 58 HRC. Conversely, if dimensions are drifting early in a “Pure Wear” run, you have room to push significantly harder. Take the specific target from this table and write it clearly on your heat treatment purchase order. Vague requests get you generic results; precise targets get you maximum tool life.
5.2 Section Size and Hardness Uniformity Requirements
Large die sections need attention to hardness distribution. D6 hardens through thick sections better than D3 steel, but physics still applies. A Ø42 mm cylinder shows 59.3 HRC at the surface and 57.8 HRC at the core. Just 1.5 HRC variation. This uniformity prevents internal stress points that start cracks.
For sections under 50 mm diameter, target your operating hardness straight on. Through-hardening gives you consistent properties from surface to center.
For sections over 50 mm, consider one HRC point higher at the surface. This compensates for slight core softness. Deep cryogenic treatment after quenching narrows this gap further. The cold cycle transforms retained austenite throughout the section, not just at the surface.
5.3 Temperature Exposure Limits
Operating temperature caps your maximum useful hardness. D6 maintains stable performance below 300°C. Push past this and hardness drops. Your heat treatment protocol won’t matter. At 500°C, a die hardened to 62 HRC softens to 56 HRC. At 600°C, it crashes to 48 HRC. Too soft for high-wear service.
Dies facing intermittent heat exposure during production stay at the 58–60 HRC range. Starting with lower hardness gives you margin against softening. Elastic steel plate bending operations (carbon content 0.65–0.80%) specify 60–62 HRC. Process temperatures stay controlled here.
Conclusion
Stop treating D6 hardness as a suggestion. To unlock the 40–60% tool life gains this steel offers, you must hit the 58–62 HRC sweet spot. Go lower, and you lose edge retention; go higher, and you risk catastrophic fracture.
The real value lies in precision: match your target hardness to your specific failure mode—wear or impact. Use the matrix above to dictate your heat treatment specs, not guess them. In high-stakes cold work, the difference between a profitable run and a shattered die is often just 2 HRC. Choose wisely.