Introduction:
Thousands of precision dies fail too soon every year. Don’t blame the D6 steel quality. The real issue lies in heat treatment errors. A single slip turns premium alloy into expensive scrap. Maybe you rush the quench. Or perhaps you fail to dissolve carbides during heating. Cracking and deformation waste your money, but you can prevent them. Learn where D6 steel thermal processing fails. This secures the reliability your production line needs.
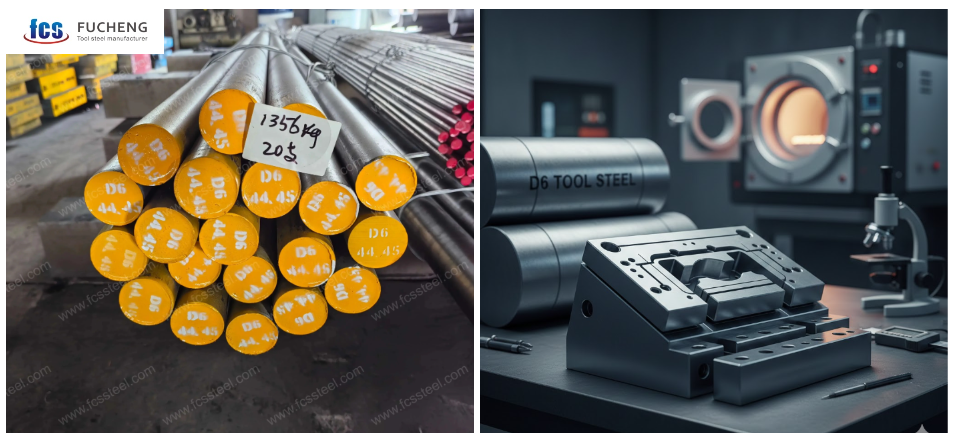
Table 1: Optimized Heat Treatment Protocol for D6 Steel
| Process Step | Temperature | Duration / Cooling | Shop Secrets |
|---|---|---|---|
| Stress Relieving | 650-700°C | 2h, Slow furnace cool | Mandatory after rough machining to prevent distortion. |
| 1st Pre-heating | 550-600°C | 1.5 min/mm thickness | Equalizes temperature; minimizes thermal stress. |
| 2nd Pre-heating | 800-850°C | Hold until core matches surface | Prepares microstructure for austenitizing. |
| Austenitizing | 980-1020°C | 30-60 mins after equalization | 1020°C yields max hardness; 980°C improves toughness. |
| Quenching | Oil, Salt Bath or Air | Cool to 60-80°C | Use vacuum furnace with 2-5 bar gas quenching for precision. |
| Tempering | 180-550°C | 2-3 cycles, 2h each | Triple tempering is non-negotiable for D6 stability. |
Source: Compiled from AISI D6 material specifications and industry-standard TTT diagrams.
Mistake 1: Neglecting Stress Relief and Pre-heating
Skip the stress relief step? Your D6 tool steel carries a hidden time bomb. Machining operations trap stresses deep inside the material. Leave them there. They combine with heat treatment stresses to crack your dies before production even starts.
Solution: The Mandatory Stress Relief Protocol
After rough machining, stress relief at 650–700°C for 2 hours releases the trapped energy from cutting and forming. Complex shapes need this step—no exceptions. Heat treatment already cuts D6’s toughness by 50% compared to its softened state. Add unrelieved machining stresses to that. You’re stacking failure conditions.
Complex shapes with deep cavities or thin walls face the highest risk. Stresses build up at cross-section changes. Heat these stressed areas during hardening? They warp or crack right where you need precision most.
Solution: Slow Pre-heat to Equalize Temperature
D6 steel’s low thermal conductivity demands patience.”Pre-heat at 820–850°C (1508–1562°F). This stage is critical for D6 to prepare the massive chromium carbides for dissolution before reaching the final austenitizing temperature of 980–1020°C (1796–1868°F).” The surface heats faster than the core. This creates temperature gaps that pull the steel apart from within.
Solution: Calculate Soak Time by Thickness
Plan 1 hour of soak time per 25.4 mm (1 inch) of thickness during austenitizing. This time ensures full carbide dissolution and even heating throughout the part. Too little soak time leaves carbides undissolved in cooler sections. Meanwhile, surface areas overheat.
“Large or intricate tools rely on the final pre-heat stage at 820–850°C to ensure the stability needed to prevent warping.”This provides the stability needed to prevent warping. Combine this with proper tempering—cooling to room temperature between each cycle. This careful approach delivers the 58–60 HRC working hardness D6 is known for. No brittleness. No premature failure.
Mistake 2: Incomplete Carbide Dissolution
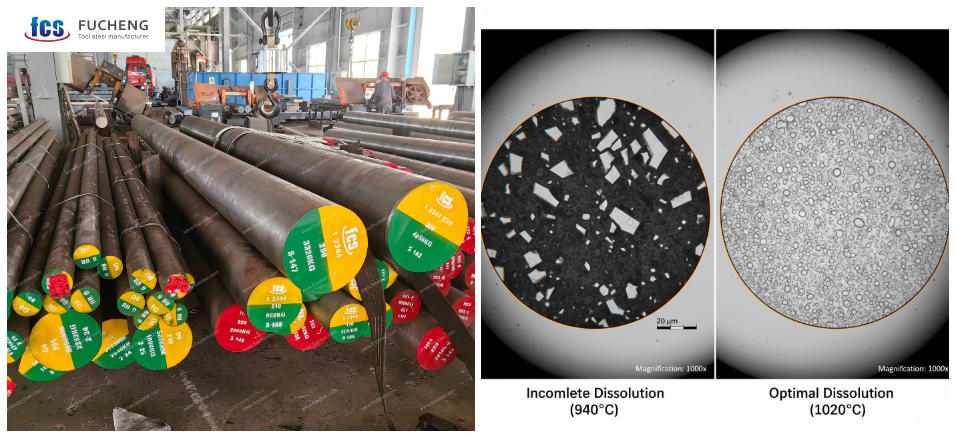
Carbide dissolution decides the fate of D6 tool steel. It either reaches full potential or stays brittle. This alloy mixes high carbon (2.0-2.25%) with 11-13% chromium. This creates tough chromium-rich carbides. You must get these carbides to dissolve into the austenite phase during heating. Skip this step, and the carbon stays locked away. The matrix won’t harden during quenching.
Solution: Balancing Temperature and Hold Time
D6 has three carbide types: MC (vanadium-rich), M2C, and M6C. They dissolve at different rates. Use the 980-1020°C range to target them. Proper processing cuts carbide volume by about 69%. This packs the matrix with carbon and spikes the hardness.
Temperature needs help from time. At 940°C, chromium carbides take 2 hours just to reach 50% dissolution. Thick sections need 4-6 hours minimum. The chromium mix slows the process. So, never rush it. Rushing leaves large, blocky carbides stuck in the matrix.
Diagnosis: How to Spot Dissolution Failures
Short soak times leave a fingerprint: a hardness gap. Say your surface hits 60-62 HRC. But the core sits at 55-58 HRC. That 3-7 point drop proves incomplete dissolution inside. Under a microscope, you’ll see undissolved carbides larger than 10 μm. Thick sections like 200 mm molds are tricky. You often need 8-12 hours at 980°C to beat core heating lag. That means 20-50% more hold time than standard math suggests.
Solution: The Core Equalization Protocol
Get even dissolution by monitoring the part. Use 3-6 thermocouples at the surface, mid-radius, and core. Hold the load at 800-850°C. Wait for the temperature difference to drop below 10°C everywhere. This takes 1-2 hours per inch of thickness.
Once balanced, ramp up to your target at 10-20°C per hour. Does the core lag by more than 20°C? Pause the ramp right away to adjust your furnace. This method ensures the whole cross-section hits a uniform 58-60 HRC working hardness.
Mistake 3: Incorrect Quenching and Delayed Tempering
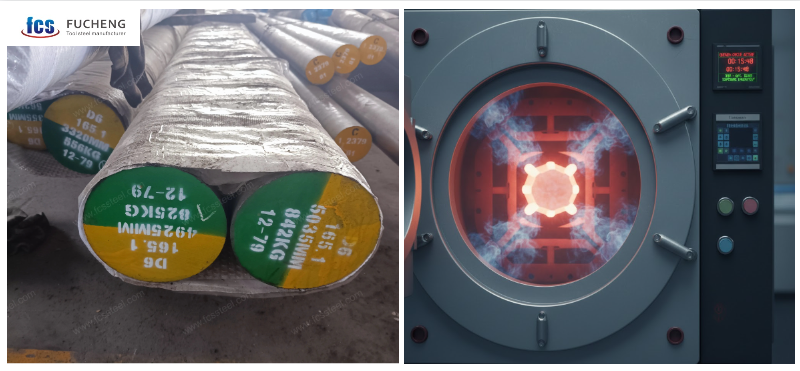
Pick the right quenching medium for D6 steel. This choice makes the difference between long service life and useless scrap. Oil quenching cools slower than air cooling. This gives you 64-66 HRC maximum hardness after quenching. But slower cooling creates more internal stress. Dies with complex shapes risk cracking in oil quenching.
“While oil quenching provides the highest raw hardness, Vacuum Gas Quenching (Air) is preferred for precision D6 dies to minimize distortion and the risk of cracking, despite a slightly slower cooling rate than oil. Distortion stays low. The trade-off? Final hardness drops compared to oil. Salt baths split the difference. They provide controlled cooling rates that spread hardness evenly across thick sections. Match your quenching method to part shape and what you need. Thin-walled precision tools work better with air cooling’s lower stress. Heavy-duty blanking dies need oil’s maximum hardness.
Solution: Avoid the Delayed Tempering Trap
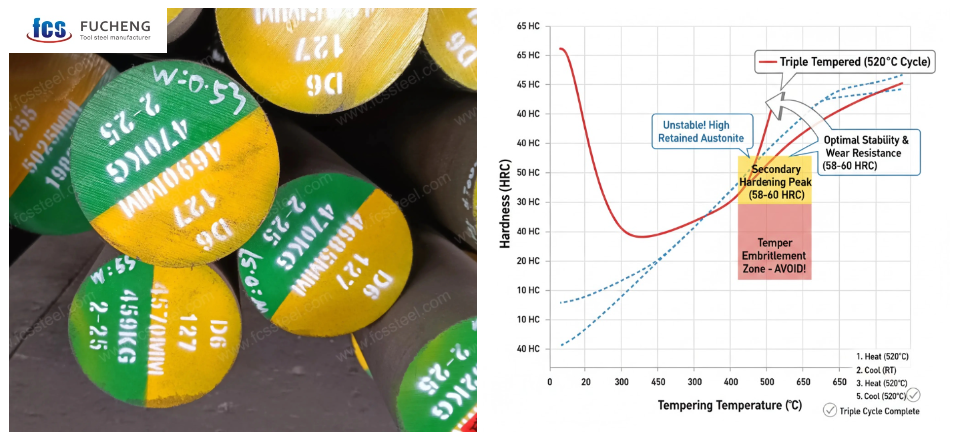
Quench D6 steel and walk away? Bad move. Retained austenite gets trapped in the microstructure. This softer phase weakens the steel’s properties. The steel turns too brittle without quick stress relief. Tempering at 200°C produces about 60 HRC—the target hardness for most die work. “D6 steel does not follow a linear hardness drop. It features a Secondary Hardening Peak; tempering at 520–530°C allows the material to reach 58–60 HRC, providing the best balance of wear resistance and dimensional stability for EDM processes.”
Pick temperature based on what your application needs. Cold-forming dies for thin sheet metal need 60-62 HRC from 200-300°C tempering. Hot-work jobs that need toughness use 500-600°C for 56-58 HRC. Watch the tempering curve. Small temperature shifts cause big hardness changes in D6’s chromium-rich structure.
Solution: Implement Multi-Stage Tempering
Single tempering leaves the job half-done. Double or triple tempering cycles change retained austenite into martensite between each heat. Cool to room temperature after each cycle—no shortcuts. This full cooling lets fresh martensite form from leftover austenite. The next tempering cycle treats this new martensite.
This step-by-step method boosts hardness consistency, toughness, and size stability all at once. Production dies that measure within ±0.005 mm tolerances need triple tempering as standard. Each cycle runs 2 hours minimum at target temperature. This time spent stops service failures from retained austenite changing during die use.
Expert Insight: “The most common cause of premature failure in D6 dies isn’t the material itself, but the retained austenite left behind by single-cycle tempering. Triple tempering is the only way to ensure dimensional lock.” — Senior Heat Treatment Consultant
Mistake 4: Single-Cycle and Over-Tempering
Just-quenched D6 steel sits at 64-66 HRC—hard, but brittle. Retained austenite hides in the microstructure like a ticking clock. One tempering cycle won’t fix this instability. The untransformed austenite stays locked in place. It’s ready to convert during service. That conversion happens under load and temperature changes. Result? Cracks appear weeks or months after the die enters production. Dimensional shifts exceed 0.05%. This ruins precision tolerances you worked hard to achieve.
Analysis: Why Single-Cycle Tempering Fails
Industry data shows single tempering leaves critical austenite untransformed. Dies develop service cracks from this incomplete treatment. Size instability becomes the norm, not the exception. The steel tries to finish its change while cutting or forming parts. Internal stresses build up during this late conversion. Complex shapes with thin walls or deep cavities warp under these stresses.
“For precision dies with tight tolerances, Triple Tempering at 520°C is the industry gold standard. This ensures that the high volume of retained austenite in D6 is fully transformed and stabilized.”
Run the first cycle for 1 hour per 25 mm of thickness. Cool all the way to room temperature—no exceptions. This cooling changes retained austenite into fresh martensite. The second cycle runs at the same temperature and time. It tempers this new martensite. Plus, it converts any remaining austenite. Dimensional stability locks in below 0.05% change. “Working hardness settles at a consistent 58–60 HRC and stays stable throughout the die’s service life.”
Table 2: Tempering vs. Performance (The Data Table)
| Tempering Temp | Hardness (HRC) | Microstructure Result | Best Application (Use Case) |
|---|---|---|---|
| 180°C-220°C | 61-63 | Tempered Martensite | Maximum Wear Resistance: Ideal for cold-forming dies and thin sheet punches. |
| 400°C | 54-56 | Transition Zone | Avoid this range: Risk of temper brittleness and lower impact toughness. |
| 520°C-530°C | 58-60 | Secondary Hardening Peak | Best for Stability: Essential for dies requiring EDM wire-cutting or PVD coating. |
| 550°C | 54-56 | Carbide precipitation | General precision dies where toughness is slightly prioritized over hardness. |
| 600°C | 48-52 | Sorbite Formation | High Toughness: Heavy impact tools where chipping resistance is more critical than wear. |
| Cryo(-185°C) | +1-2HRC | Near-zero Retained Austenite | Ultra-precision: Gauges and aerospace components with (±0.005mm) tolerances. |
Solution: Avoiding the Over-Tempering Zone
Temperature control separates success from disaster. The tempering curve for D6 shows clear performance peaks:
| Tempering Temperature | Resulting Hardness | Performance Note |
|---|---|---|
| 500°C | 56 HRC | High hardness, reduced toughness |
| 520-530°C | 58-60 HRC | Optimal wear resistance peak |
| 600°C | 48 HRC | Balanced properties |
| >600°C | <45 HRC | Rapid strength collapse |
Push past 600°C and watch your steel break down. At 680°C, wear loss doubles to 55.7 mg compared to 27.8 mg at the optimal 550°C mark. Carbides grow into blocky shapes. The fine tempered martensite breaks down into tempered sorbite—soft and weak. Surface finish after wear testing becomes rough. You’ll see plastic bulge marks. Dies that should last years burn out in months.
Even small changes matter. A ±10°C shift at 500-600°C moves you off the hardness peak. Too cold? You sacrifice toughness while keeping brittleness. Too hot? Hardness drops faster than toughness increases. This narrow window needs accurate pyrometry and furnace profiling.
Protocol: The Verified Triple-Cycle Method
Production dies holding ±0.005 mm tolerances cannot survive on guesswork. Follow this verified master procedure:
- Quench: Heat to 980–1020°C, soak, then quench to 60–80°C to reach 63–65 HRC.
- 1st Temper: Heat to 520–530°C, hold for 2h minimum, then air cool to room temperature. (Transforms austenite).
- 2nd Temper: Repeat the same cycle. (Tempers new martensite).
- 3rd Temper: Repeat once more. (Ensures final stress relief and dimensional lock).
This triple cycle releases quenching stresses that single tempering leaves behind. Complex shapes stay stable instead of warping during service. The change happens in your furnace, not in your customer’s production run. Secondary hardening peaks at 520-530°C give maximum wear resistance with smooth, clean surfaces. Skip the second cycle? You’re gambling with retained austenite that changes on its own schedule—never in your favor.
Mistake 5: Aggressive Cooling and Hard Machining
The temper cycle finishes. Your D6 steel sits at the target hardness. One rushed cooling decision erases hours of careful heat treatment work. How you handle post-treatment separates dies that perform for years from those that fail within weeks. Two critical errors cause most problems: aggressive cooling after tempering and trying to machine hardened material.
Solution: Air Cool Gently—Never Water Quench
Just-tempered D6 steel at 210°C needs slow air cooling to room temperature. Never water quench it. Water cooling creates thermal shock. This shock brings back the exact stresses you just spent 2 hours removing. The fast temperature drop from 210°C causes lattice contraction. This creates fresh breaks throughout the metal structure. These internal defects contribute 28% performance loss in service.
Follow this proven cooling method instead:
- Remove from tempering furnace at 210°C
- Air cool in still air—no forced cooling fans
- Wait for complete thermal balance to room temperature
- Use inert gas atmosphere (Argon) to prevent surface rust
- Avoid stacking parts—keep even air flow around each piece
Production environments need patience here. Stack hot dies together? The center pieces cool slower than edges. This creates temperature differences that warp tight dimensions you worked to hold within ±0.005 mm tolerances.
Upgrade: Boosting Performance with Cryogenics
Advanced uses benefit from cryogenic treatment at -185°C for 20-40 hours after standard tempering. This deep cold treatment helps fine carbide buildup. This boosts wear resistance. Research on D6 steel shows the best cooling rate of 3°C per minute during cryogenic cycling. Faster rates introduce thermal shock. Slower rates waste production time without extra benefit.
The key factors that control cryogenic results break down like this:
– Holding time: 49.01% of total performance impact
– Cooling rate: 27.74% contribution
– Number of cycles: 18.85% influence
Deep cryogenic treatment at -185°C beats shallow treatment at -63°C. Pin-on-disk wear testing proves deep cryo reduces wear volume at higher loads and speeds. After cryogenic treatment, stabilize parts at room temperature for 1 week minimum. This aging period allows secondary carbide buildup to finish. The result gives you maximum wear resistance with stable dimensions.
Hold times beyond 40 hours show smaller returns. Long holds past 5 hours risk carbide growth. This growth reduces the hardness gains you worked to achieve.
Solution: Follow the Correct Machining Sequence
Hardened D6 steel at 64-66 HRC resists standard machining. Direct milling or drilling after quenching breaks cutting tools. It damages die surfaces. The carbide-rich structure at this hardness creates too much cutting force. This destroys tooling within minutes.
Proper machining sequence for D6 tool steel:
- Machine to near-final size in the annealed state at 225 Brinell hardness (after softening anneal at 800-840°C)
- Leave grinding stock of 0.5-1.0 mm on critical surfaces
- Complete all drilling, milling, and complex machining before hardening
- Heat treat to working hardness following proper steps
- Finish grind after full heat treatment and stabilization
Annealed D6 at 225 HB machines like common tool steels. Cutting forces stay manageable. Tool life remains cheap. After hardening to 64-66 HRC, switch to grinding with diamond or CBN wheels for final size. EDM (electrical discharge machining) works for hardened D6 when grinding cannot reach complex internal features.
Trying standard machining on hardened D6 wastes carbide tools. It risks micro-cracks in the die surface. These surface cracks spread during service. They turn into the big failures you worked to prevent through careful heat treatment. Plan your machining sequence during the design phase. This saves both time and tooling costs through the die making process.
Table 3: Troubleshooting & Diagnosis
| Symptom | Primary Root Cause | Expert Solution (Remedy) |
|---|---|---|
| Quench Cracks | Skipped Stress Relief or fast heating | Implement the 820–850°C step-preheat. |
| Low Core Hardness | Insufficient Soak Time | Increase austenitizing time by 20-30% for thick sections (>100mm). |
| Edge Chipping | Over-heating / Grain Coarsening | Keep austenitizing below 1000°C; check furnace thermocouple accuracy. |
| Size Instability | Retained Austenite (1 cycle only) | Switch to Triple Tempering at 520°C |
| Grinding Cracks | Improper tempering or dry grinding | Ensure 3rd tempering is done; use flood coolant or CBN wheels. |
Conclusion
D6 heat treatment needs more than a generic recipe. You must control pre-heating, austenitizing, and tempering with care. Follow these rules to get high-performance dies. They can last 500,000 cycles. Ignore them, and you risk early failure.
Avoid the mistakes we listed here. You prevent thermal shock. You also ensure carbide dissolves the right way. That gives you the stability your production needs. Don’t let process errors drain your budget. Check your settings against these guidelines today. The choice between profit and scrap often sits in these exact details.